Smile Gallery
Dr. Mirelez Smile Gallery: Actual Patients
Implants GalleryBonding GalleryCrowns GalleryFillings GalleryRoot Canal Gallery
Implants are a very good option for replacing a single tooth or many teeth. This gallery is designed to show you some of the uses of dental implants.


BEFORE
AFTER
GuidedSMILE Teeth In A Day
BEFORE
AFTER
Lower Implant Bridges – Upper Denture
BEFORE
AFTER
Implant with Non-Removable Zirconia Teeth
BEFORE
AFTER
Upper Implant GuidedSMILE Teeth In A Day
BEFORE
AFTER
Upper Removable Teeth with Lower Implant Non-Removable Teeth
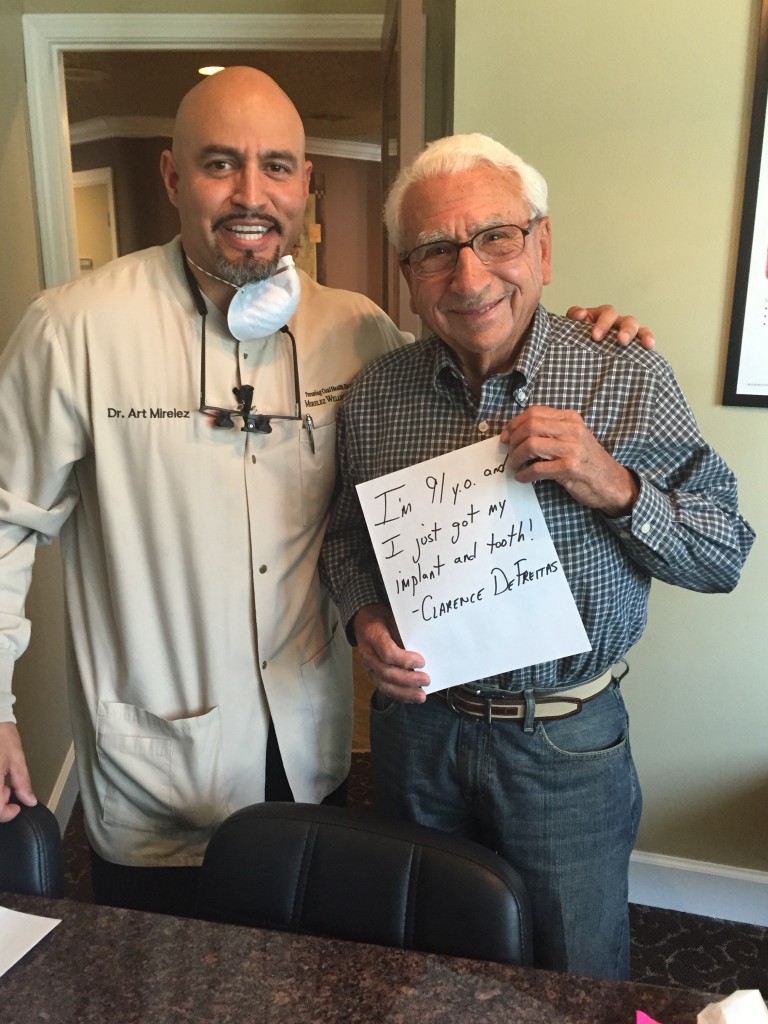
Oldest Implant Patient – 91 Years Old
BEFORE
AFTER
Implant GuidedSMILE Teeth In A Day
BEFORE
AFTER
Upper Implant GuidedSMILE Teeth In A Day
BEFORE
AFTER
Implants with Non-Removable Teeth
BEFORE
AFTER
Upper Implant GuidedSMILE with Lower Bonding and Orthodontics
BEFORE
AFTER
Upper Single Implants, Crowns and Orthodontics
BEFORE
AFTER
Upper and Lower Implants with Snap On Teeth
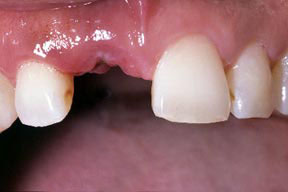
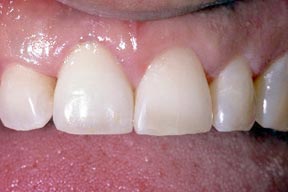
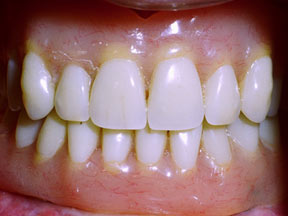
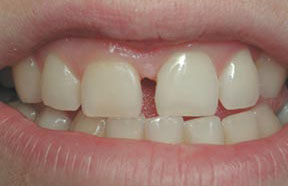
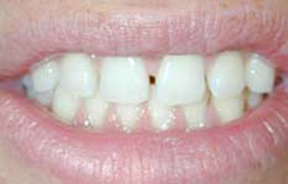
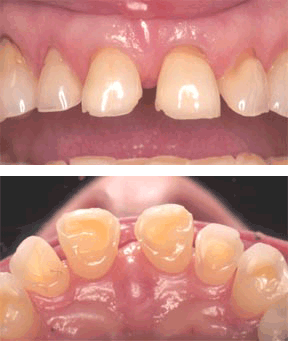
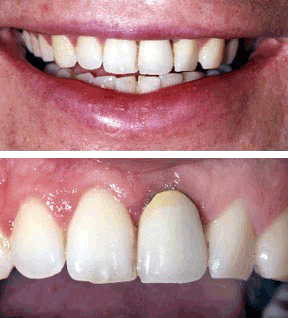
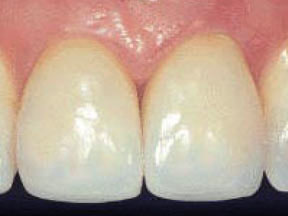
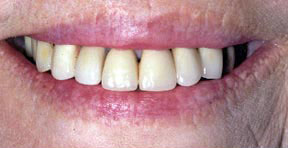
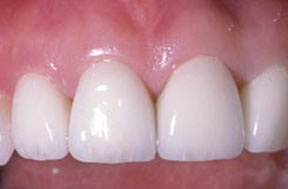
BEFORE | This patient lost her front tooth in an ice skating accident. The options were to place a three tooth bridge, which requires the removal of some of the adjacent teeth; an implant; or a removable appliance such as a partial denture. The patient chose to have an implant placed.
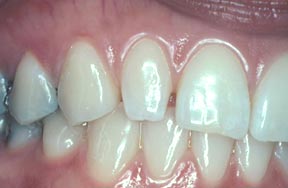
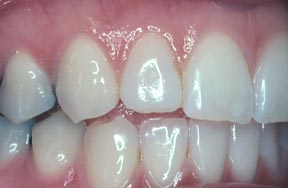
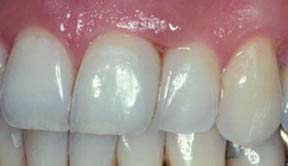
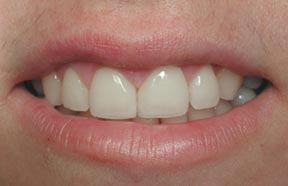
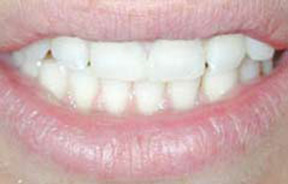
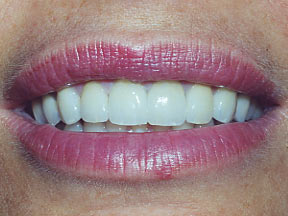
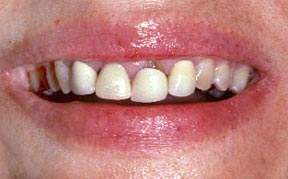
AFTER | The completed treatment appears completely natural. If you did not know that there had been a tooth missing, you would not be able to tell that any treatment had been done.
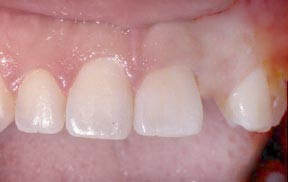
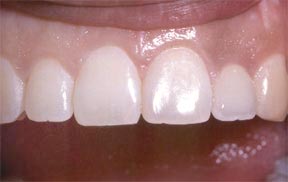
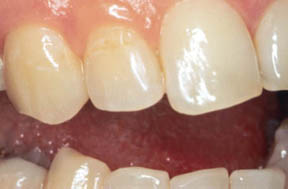
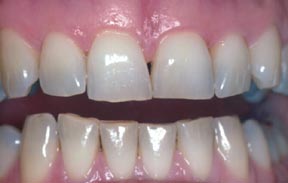
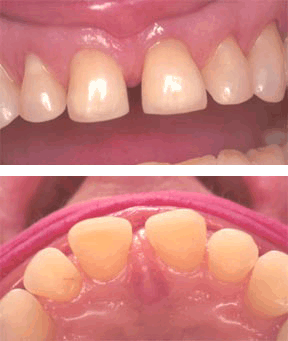
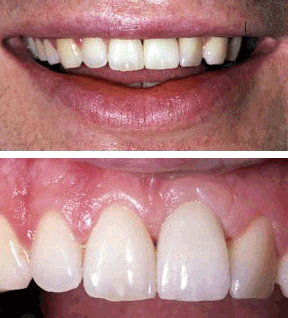
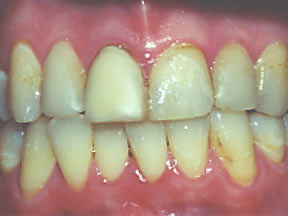
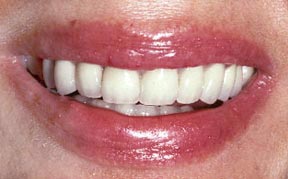
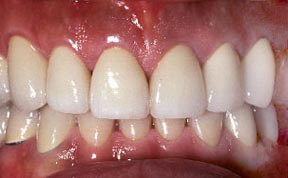
BEFORE | The most common of the congenitally missing teeth are the upper laterals. This patient was born without an adult lateral tooth.
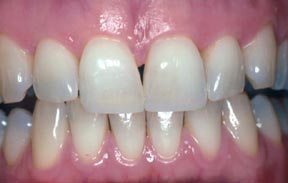
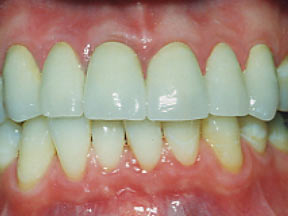
AFTER | A single implant was placed and the result is very natural looking. The center tooth, next to the implant, had a veneer placed on it, and the gum tissue was trimmed so that it matched the center tooth next to it.
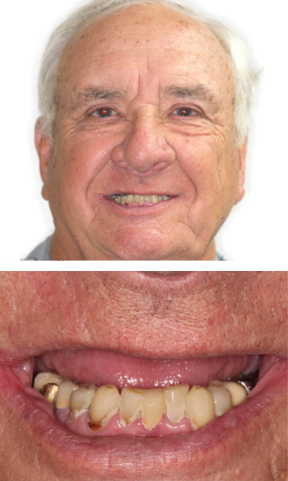
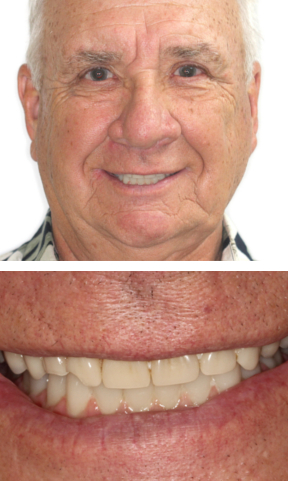
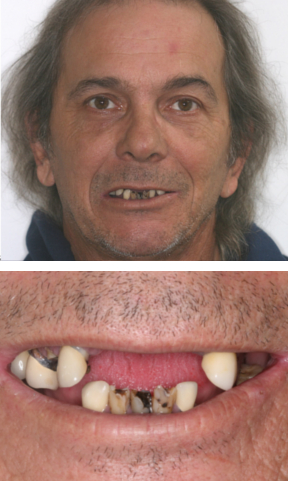
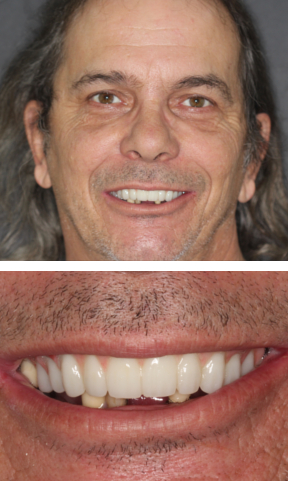
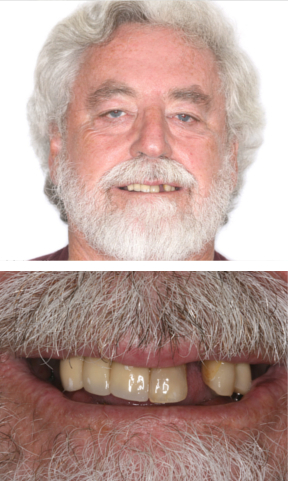
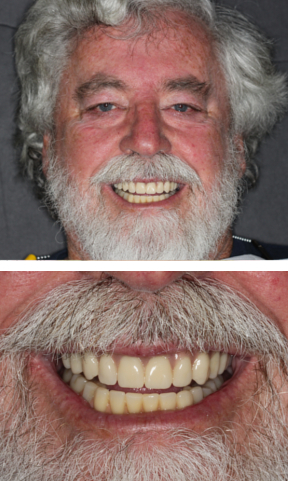
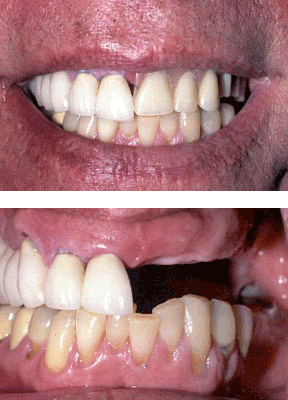
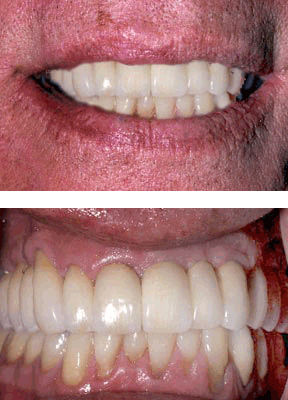
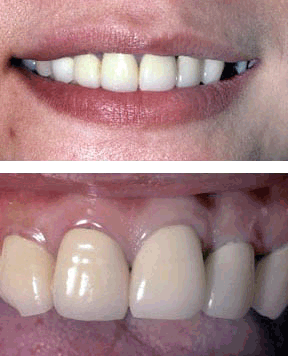
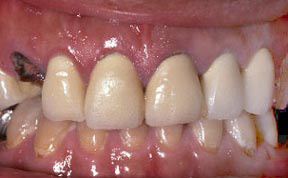
BEFORE | This patient lost several teeth in an auto accident. In the top photo, he is wearing a removable partial denture, which did not match his other teeth, which were had porcelain crowns.
AFTER | Six implants were placed and the old crowns were replaced. The result is very natural looking and the patient now has the confidence to eat, laugh, and smile.
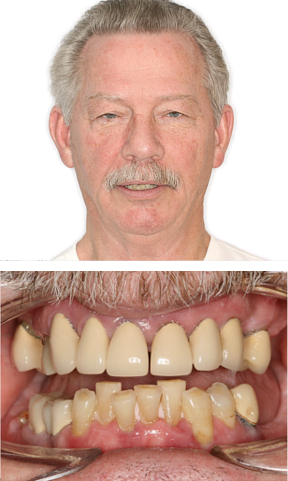
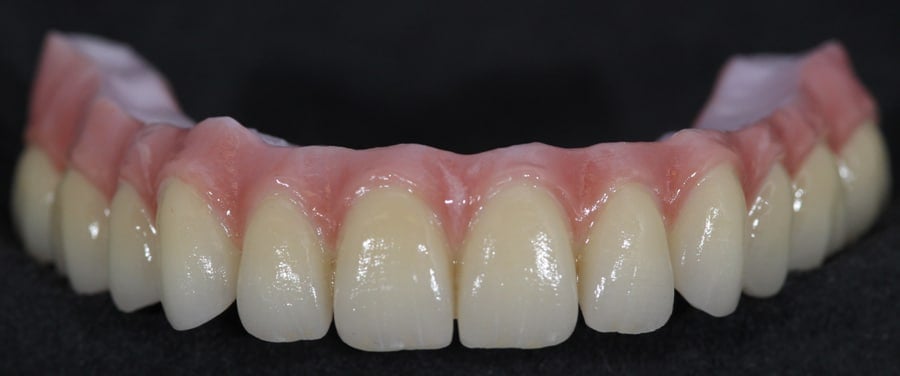
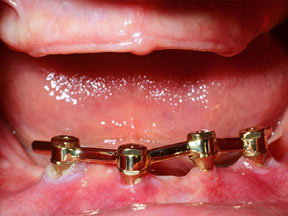
BEFORE | This patient lost all of his natural teeth many years ago and wore upper and lower full dentures, but had difficulty with his lower dentures staying in place. Implants were placed on the bottom. The patient had no problem with his top denture staying in place so no implants were placed on top.
AFTER | The lower denture clips onto the bars between the implants and is very stable, yet the patient is able to remove the denture when he needs to brush and clean the implants. The result is a solid chewing surface and the patient can eat whatever food he desires.
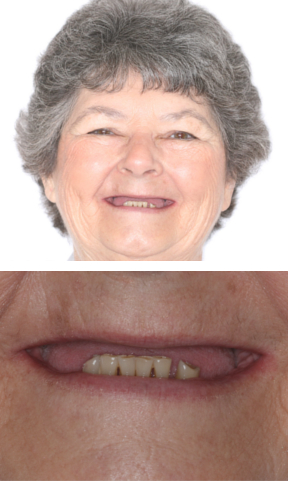
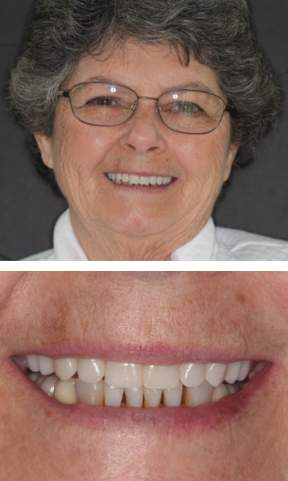
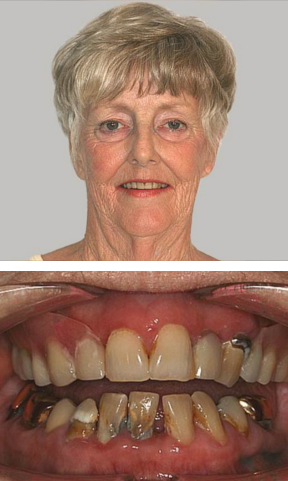
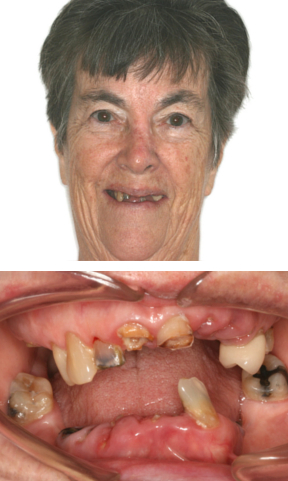
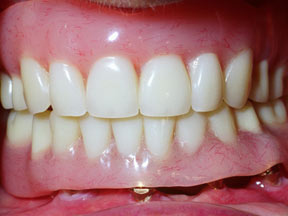
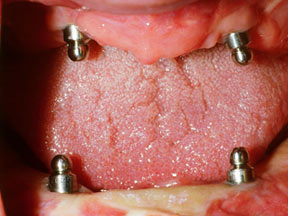
BEFORE | This patient had lost all of her natural teeth and had worn dentures for over 20 years. Both the top and bottom dentures were loose because there was not much bone for the denture to sit on. Four implants, two on top and two on the bottom, were placed.
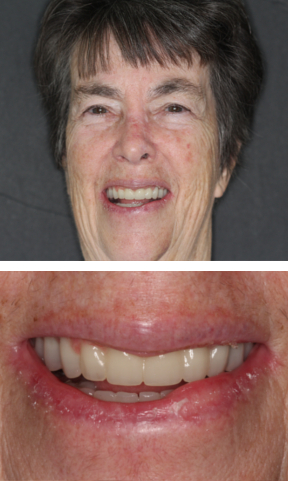
AFTER | The dentures are removable for cleaning, but they clip onto the implants using rings. They are very stable and natural looking.
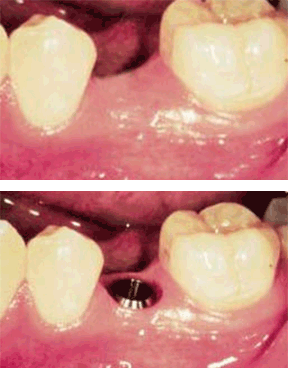
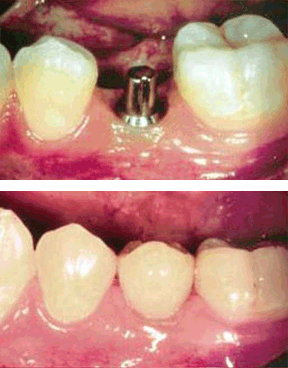
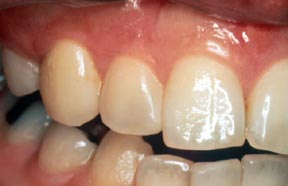
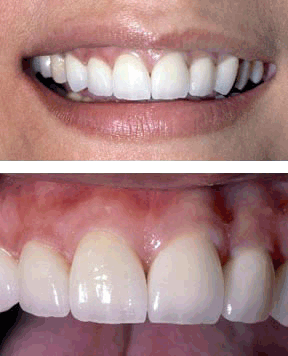
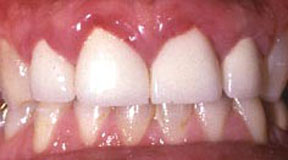
BEFORE | The picture on top shows the patient with a missing tooth. On the bottom, a dental implant has been placed and the gum tissue has healed for six weeks.
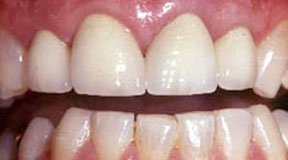
AFTER | The picture on top shows the implant with a post, which is the foundation for a porcelain crown. On the bottom is the finished treatment, which shows how natural dental implants can appear.
Bonding is a process used to restore chipped, discolored, and misshapen teeth in a single visit. The results are very natural in appearance, but bonding does take more maintenance than porcelain veneers and may not last as long. Less tooth structure needs to be removed, which makes bonding a more conservative choice for some cases.

BEFORE | This tooth has a developmental defect, which is called a peg lateral. This only occurs in the lateral teeth, one tooth away from the centerline of the mouth on each side. There is nothing wrong with the tooth but the patient wanted to have it treated for cosmetic reasons.
AFTER | The treatment consisted of shaping the tooth with a composite material to make it look more natural. This procedure took one appointment and was done without any anesthetic. Periodic polishing will help maintain the shine and luster of this restoration for many years.
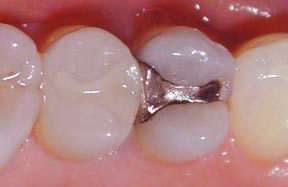
BEFORE | This is an old tooth-colored filling that has been in place for many years and needs to be replaced because of discoloration as well as wear. The wear may allow bacteria to enter and cause decay if the filling is not replaced.
AFTER | The filling has been replaced with a newer tooth-colored filling that should last for many years. This restoration was completed in one office visit.
BEFORE | This patient was unhappy with the space between two of her teeth. This was the result of a periodontal (gum) defect between the teeth.
AFTER | Composite, which is a tooth-colored material, was bonded to both of the teeth. This procedure took one office visit. The result was a more aesthetically pleasing appearance and it gave the patient confidence to smile again.
BEFORE | This patient was unhappy with two issues: the space between her upper front teeth and the different heights of the gum tissue above her teeth, which made the teeth appear to be of different lengths.
AFTER | Step one of her treatment was to even out the height of the gum tissue. After healing, which took several weeks, the space, which dentists call a diastema, was closed using composites bonded to her teeth. The total number of treatments was two; one for the gum tissue and one for the bonding and the result was exactly what the patient had in mind.
BEFORE | The lateral, or side tooth, had an old tooth-colored filling that was showing its age. Older composites were much more porous than the newer composites and, therefore, they show more discoloration over time.
AFTER | In one office visit, the old filling was removed and replaced with new composite bonding material. The result is a much more natural appearance.
BEFORE | This patient did not like the natural gap between his two front teeth.
AFTER | Composite bonding was placed in one office visit. Bonding takes periodic touch-ups to keep it looking like new.
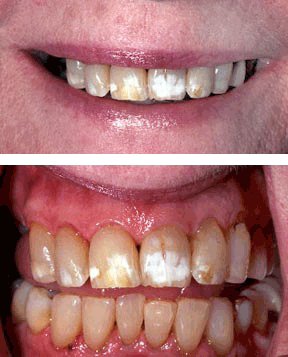
BEFORE | This patient was not happy with the color of her teeth. She also disliked the worn edges of her top teeth, related to her teeth-grinding habits.
AFTER | First, the patient’s teeth were lightened with an at-home whitening process. When she was satisfied with the color, composite bonding was added to the edges to restore the natural tooth structure that was lost due to grinding.
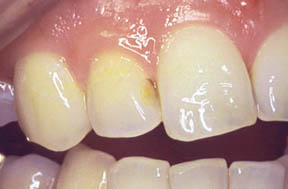
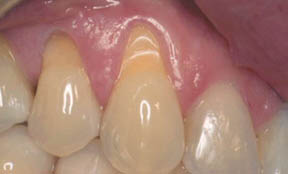
BEFORE | There are several issues with this patient’s teeth. He is a heavy grinder, which causes the edges of the teeth to chip away and the wear patterns in the lower image. The yellowish area is the second layer of tooth structure, which is the dentin. The dentin is much softer than the outer layer of tooth (enamel). If you look closely at the top image, you will also see that the teeth are starting to wear away at the gum line, which may be caused by grinding or by brushing too hard.
AFTER | The treatment consisted of composite bonding at the gum line, at the edges of the teeth, and on the inside, as well as making a nightguard to protect the composite and the tooth structure. The results were very good when compared to the before images. The patient did not want the space closed.
Crowns are placed when the entire structure of a tooth is compromised or when missing teeth are replaced with fixed bridgework. The cases in the Crowns Gallery are examples of treatment that can be provided using porcelain crowns.


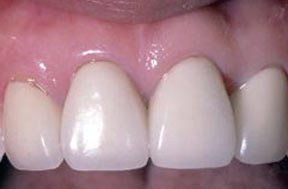
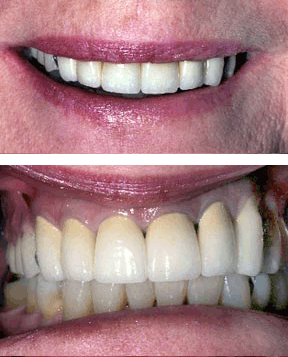
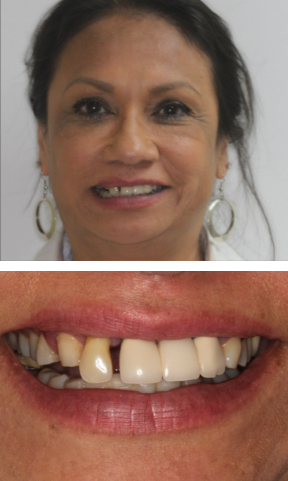
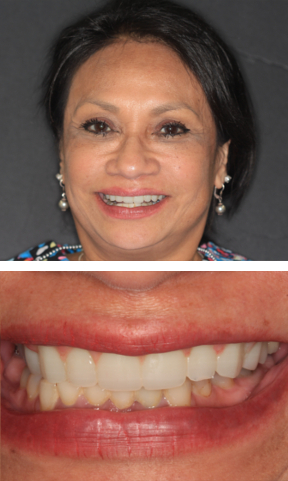
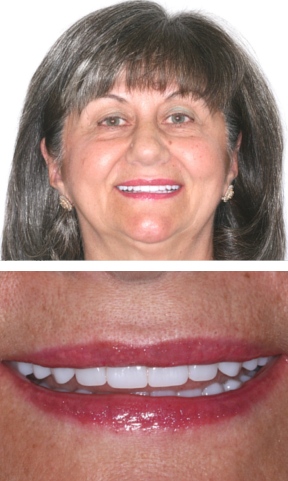
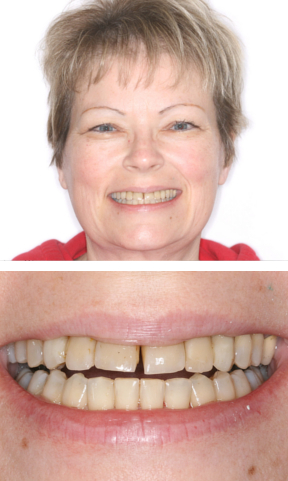
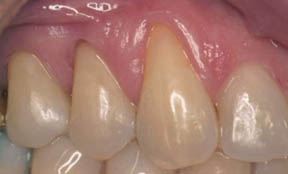
BEFORE | This patient had four porcelain crowns placed on her front four teeth from a previous dentist following a rollerblading accident. She was not happy with the color and she felt that they did not look very life-like. She had also chipped the tooth on the far left.
AFTER | The previous crowns were removed and after two appointments the new porcelain crowns were cemented. They now have the appearance of natural teeth and have a definite lifelike quality to them. The patient is very happy with the result.
BEFORE | Most dentists would agree that the single hardest restoration to do is a single crown on a central incisor. The upper central incisors are the two front teeth in the middle of the upper jaw. It is a difficult process because the crown must match the remaining central incisor. This patient had a crown placed by a previous dentist. After a few years the gum tissue receded and exposed the margin.
AFTER | The previous crown was removed, and after two appointments, the new porcelain crown was cemented. The new crown matches the adjacent central incisor and has the appearance of a natural tooth.
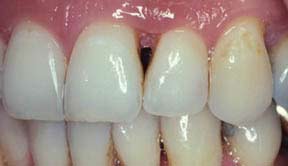
BEFORE | This patient had existing crowns on the front four teeth that were too white (yes, crowns can be too white!). They did not fit the teeth properly and caused the gums to swell and become red. The way in which crowns fit the teeth is as important as the way they look.
AFTER | The old crowns were replaced with new porcelain crowns. The new crowns appear more natural and fit the teeth properly; evident by the way the porcelain meets the gums.. In cases like these, the gum tissue takes a few weeks to heal.
BEFORE | This patient had an existing crown on a central incisor and was unhappy with the unrealistic appearance. He was similarly unhappy with the shape, color, and appearance of his other, natural teeth.
AFTER | The previous crown was removed. At his second appointment, the new porcelain crown and five porcelain veneers were cemented. The teeth are now in harmony and they look very natural. The lower teeth were cleaned and whitened before the top teeth were restored so that the the teeth are now in harmony and look very natural.
BEFORE | This is a combination case involving both crowns and veneers. There were old porcelain crowns on the two front teeth. The patient was unhappy with the color, shape, and length.
AFTER | The treatment involved the front six teeth. The old porcelain crowns on the two front teeth were replaced with new porcelain crowns. Four porcelain veneers were placed on the two teeth on either side of the front teeth. The result is natural-looking and aesthetically pleasing. The patient was very pleased and was no longer self-conscious about her smile.
BEFORE | This is an extreme close up of two porcelain crowns that were placed by a previous dentist. The patient was unhappy because the crowns were not equal in size and a black edge was visible near the gumline of the crown on the right of the photograph.
AFTER | Two new porcelain crowns were made and placed with a much better result. They look more natural and life-like than the previous crowns.
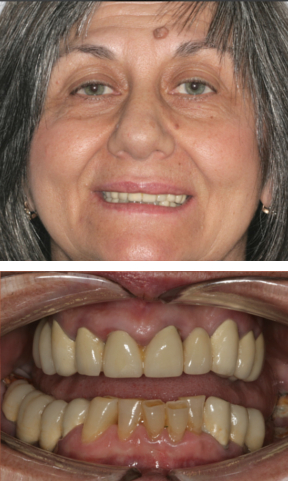
BEFORE | This patient had crowns and bridges on several teeth that were decayed. This necessitated replacement of the existing work. Her wish list was to improve the aesthetics and the angulation.
AFTER | The results rejuvenated the patient. In her words, “All I have to do is open my mouth and my teeth are smiling!”
BEFORE | This patient had crowns and large fillings on almost all of her top teeth. She was so unhappy with her current appearance that when asked to smile she said, “I don’t have one.”
AFTER | Treatment involved placing ten porcelain crowns. The results are evident in the expression on her lips. The word “smile” was back in her vocabulary.
BEFORE | This is another close up of the front four teeth. The gum tissue is healthy but the patient wanted more natural-looking crowns to replace the old crowns, which were starting to show darkness at the gumline and appeared dull.
AFTER | The four crowns were replaced with four porcelain crowns that met the patient’s desire for them to look like natural teeth.
BEFORE | This patient’s tooth broke off at the gumline. He also had crowns on some teeth that did not fit well and needed to be replaced.
AFTER | The patient was very happy with the results. An implant replaced the broken tooth, the old crowns were replaced, and the bottom teeth were whitened.
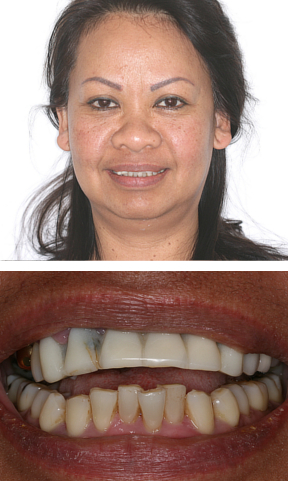
BEFORE | As evident in the lower image, the patient was missing the upper back teeth on one side (left side of the photo). She was unhappy with the missing teeth and the appearance of the rest of her teeth.
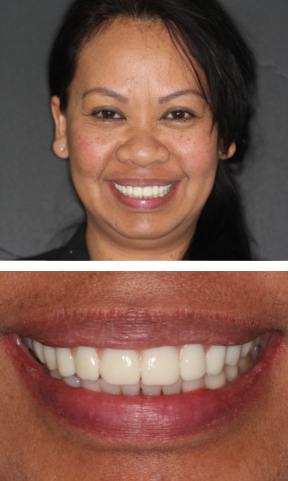
AFTER | The results were achieved with implants to replace the missing teeth and crowns and veneers to improve the aesthetics of her natural teeth.
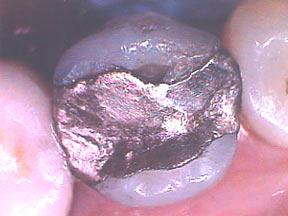
BEFORE | This is an image of the last three teeth in the lower jaw. They had very old silver fillings. The fillings and the teeth were wearing out.
AFTER | The treatment consisted of placing porcelain crowns on the teeth. These crowns are more than just for appearance. They returned the teeth to their original height and shape; restoring function.
A filling replaces a portion of a tooth due to decay or breakage. Fillings may take one or two appointments. A filling that is made in your mouth takes one appointment and one that is made out of your mouth typically takes two appointments.
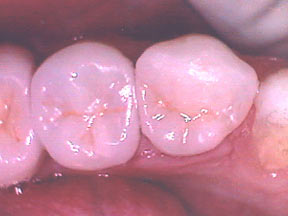

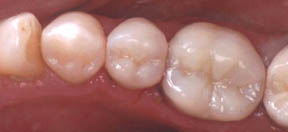
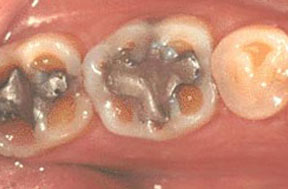
BEFORE | These are two old silver fillings that have served the patient well for many years. They are starting to show their age and need to be replaced.
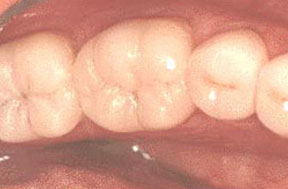
AFTER | he left tooth was restored with a porcelain onlay, which covers the entire chewing surface of the tooth. The right tooth was restored with a porcelain inlay, which covers only the necessary part of the chewing surface.
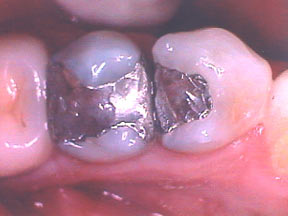
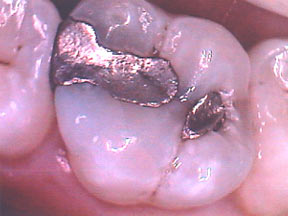
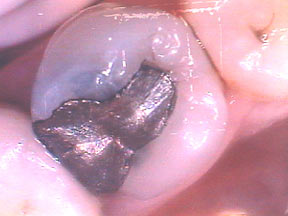
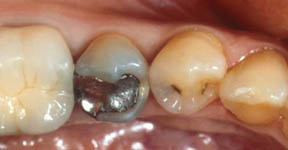
BEFORE | This is a back molar with two separate silver fillings that are very old. They need to be replaced.
AFTER | The tooth was restored with a porcelain inlay, which leaves the cusps of the natural teeth exposed.
]
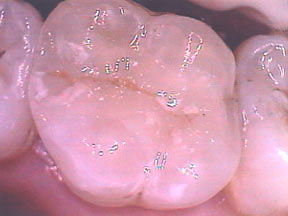
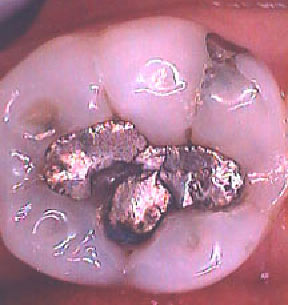
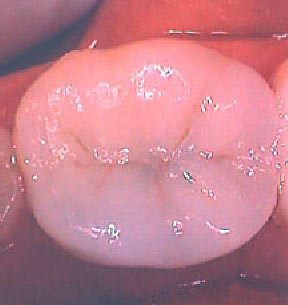
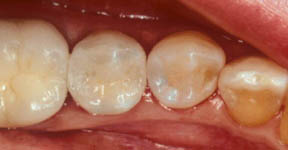
BEFORE | This is another silver filling that is showing its age and needs to be replaced.
AFTER | The tooth was restored with a porcelain onlay since the cusps, which are the tips of the teeth, were too weak to be restored without being covered.
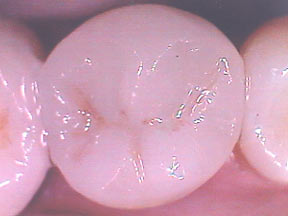
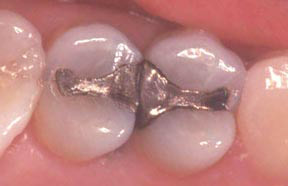
BEFORE | This is a silver filling that had decay near the gumline and needed to be replaced.
AFTER | The filling was removed and replaced with a porcelain inlay. The majority of the tooth was healthy and did not need to be restored.
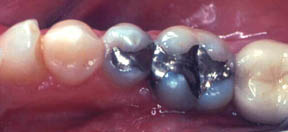
BEFORE | This is a lower molar with a fractured silver filling on the chewing surface and a separate silver filling on the outside portion of the tooth.
AFTER | The extent of the decay indicated replacement of the entire chewing surface, so a porcelain onlay was used.
BEFORE | These two teeth had old silver fillings that needed to be replaced.
AFTER | The smaller tooth was restored with a porcelain inlay and the larger tooth was restored with a porcelain onlay.
BEFORE | This tooth has a large silver filling that is several years old and needs to be replaced.
AFTER | A porcelain inlay was used, which restored the natural beauty of the tooth.
BEFORE | The silver filling on the left had decay underneath it that was detected with an x-ray during a routine check-up.
AFTER | The silver filling was removed and it was replaced with a tooth colored composite filling that took a single appointment.
BEFORE | The tooth in the middle of the image had a silver filling that needed to be replaced due to new decay at the gumline.
AFTER | The tooth was restored in one appointment with a composite filling.
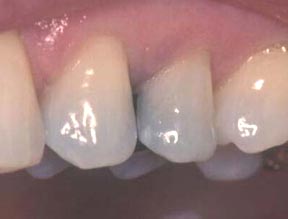
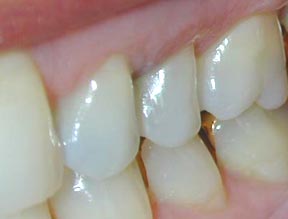
BEFORE | Both of these teeth had been brushed too hard with a hard-bristled toothbrush, which caused the gum to recede and the root surface to be scrubbed away.
AFTER | Both teeth were restored with composite bonding, which replaced the missing root structure and provided protection to the remaining root surface.
If the nerve of a tooth gets infected, it can be extremely painful. The goal of root canal treatment is to relieve pain, and restore your smile!
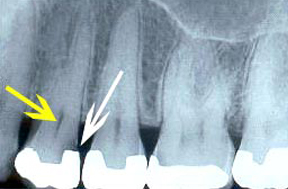
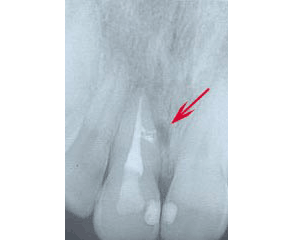
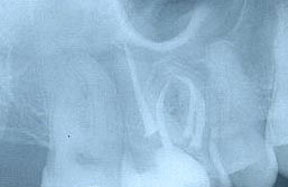
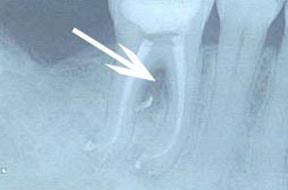
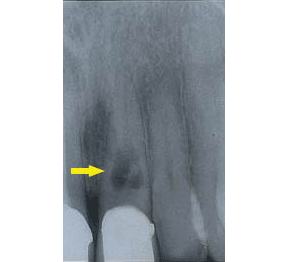
BEFORE | A root canal procedure involves removing diseased tissues (indicated by the yellow arrow), which contain the nerve and blood supply of a tooth, and replacing it with a rubber-type material. The area that is filled is called the “root canal.” The root canal of each tooth is very different. The reason this tooth needed a root canal was due to decay (indicated by the white arrow) entering the pulp.
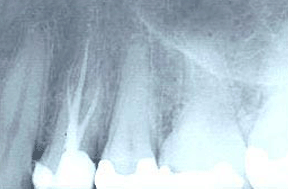
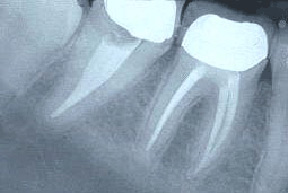
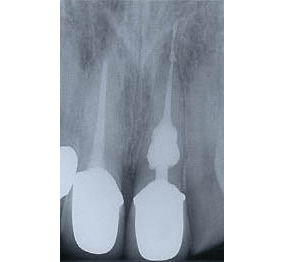
AFTER | This is what the completed root canal looks like on an x-ray. This tooth had three canals, which you can see by the white filling material in the root portion of the tooth.
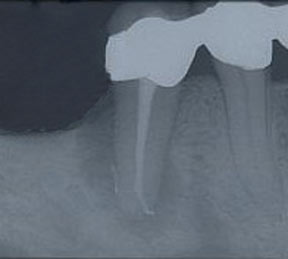
BEFORE | This tooth has what is called an “accessory canal,” which is a canal that splinters off in an unexpected direction. This tooth had to be retreated due to the first root canal failing, which is evident by the dark area, which is where the arrow is pointing. Upon retreatment, the accessory canal was found and filled, and the prognosis for this tooth is good.
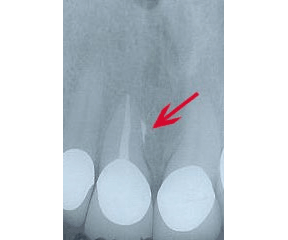
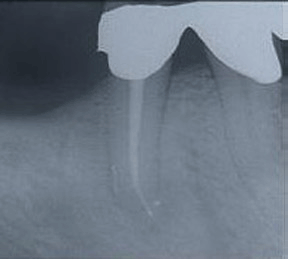
AFTER | This is a different tooth that also had an accessory canal, in the area indicated by the red arrow. The prognosis for this tooth is also good, but as with most root canals, a periodic exam and x-ray are needed to monitor for any issues.
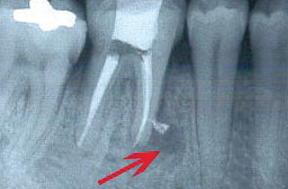
BEFORE | This is an example of a back tooth that developed a cyst (the dark area around the tip of the root). A root canal was performed and you can see some of the root canal filling material in the dark area, which represents an accessory canal. The prognosis for this tooth is good because the accessory canal was found and filled.
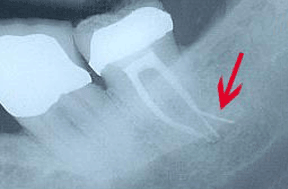
AFTER | This is another example of an accessory canal in a back tooth. This canal,by the red arrow, was rather large. The prognosis for this tooth is also good because the accessory canal was found and filled.
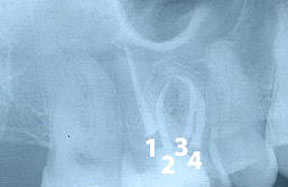
BEFORE | This is an x-ray of an upper molar with four canals, which is not very common. What makes the treatment of this tooth more difficult is the curvy nature of its canals.
AFTER | The four canals have been labeled on this x-ray. Canal #1 is very straight but the other three canals, especially #3, are curved. Each canal must be free of any nerve or blood tissue before it is filled to ensure a good prognosis.
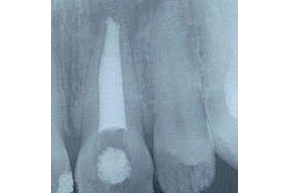
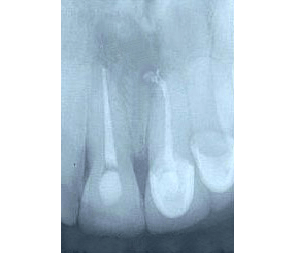
BEFORE | Most of the canals, where the nerve and blood vessels of the tooth reside, are narrow like the wick of a candle. Some canals are very wide, similar to this x-ray of a front tooth. This means there is less tooth structure surrounding the canal, which can indicate that the tooth is weaker.
AFTER | The tooth on the right is what we typically expect to see in regard to a normal root canal anatomy. This tooth has three separate canals. The tooth on the left has only a single canal, which is why the filling material appears so wide. The internal anatomy of each tooth is different, which makes each root canal procedure unique.
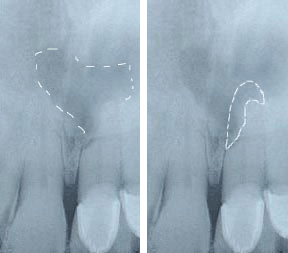
BEFORE | This is an x-ray of an upper front tooth. The root on this tooth is shorter than normal. The cells of the root of the tooth are being eaten away in a process that is called external resorption. This process usually occurs very slowly over a several months or years and is usually associated with some sort of trauma to the tooth. The dotted line on the left image above indicates an infection from the left tooth. The dotted line on the right image above represents that portion of the root of the tooth that has been lost due to the resorption.
AFTER | The treatment is a conventional root canal procedure, which may take one or two visits. This procedure is a last attempt at saving the tooth. The success of this procedure depends upon when the resorption is diagnosed and treated, the length of the root of the tooth, and the health of the surrounding bone. An annual exam with x-rays is the only way to monitor the prognosis of the tooth. In the case above, both teeth showed signs of resorption, which is why they were each treated with a root canal.
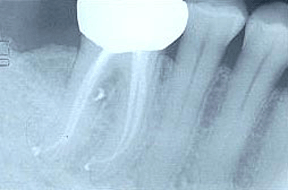
BEFORE | This is an x-ray of a back tooth, known as a molar, which was taken immediately after root canal treatment. The arrow is pointing to a dark area, where there is an infection.
AFTER | This x-ray was taken approximately one year after the root canal treatment. Notice that the dark area has filled in with bone, indicating that the root canal was successful. The large white area on the top portion of the tooth is a crown, which is required treatment for almost all back teeth that have a root canal.
BEFORE | The yellow arrow above indicates internal resorption. This occurs when the cells inside the tooth destroy the root from the inside out. This process usually happens very slowly over a matter of months or years and is usually associated with some sort of trauma to the tooth.
AFTER | The treatment for internal resorption usually takes a two or more appointments. First, a medicated filling is placed and then, after a few weeks, the medicated filling is removed and the procedure is completed in the conventional way. This type of condition requires annual examination by x-ray to check on the tooth. The prognosis is fair to poor, but the only other option is to extract the tooth.
BEFORE | The dark area around the entire root of the tooth above indicates the presence of a large infection.
AFTER | Conventional root canal treatment was performed and this is an x-ray of the tooth about six months later. You can see the dark infected area has disappeared and has been replaced by healthy bone structure. The prognosis for this tooth is excellent.
